If you already have a screen(s), then you need to determine the resolution of your screen(s) so you will know the canvas size when you develop content for them.
If you need to buy screens then follow these guidelines:
- Determine acquisition path, direct or through AV/IT integrator
- We recommend commercial screens for commercial environments, 1920 x 1080 (HD) resolution at least, if new. (the Royal Blue color in image to right)
- Deploy screens with the same resolution (res) in all locations to simplify content deployment (screen sizes can be different, but the resolution can be the same)
- Consider screens with integrated players often referred to as System on a Chip (SoC), e.g. Samsung, NEC, LG (see Step 2: Players)
 A screen needs a player (computer) that can run an up-to-date browser like Chrome, Firefox, Edge or Safari
 to play the Display5 Show. There are 100’s of options open to you. If you have screens with integrated players, often referred to as System on a Chip (SoC) the go-to STEP 3.
If you need to buy a player(s) then follow these guidelines:
- Determine acquisition path, direct or through AV/IT integrator
- Pick the player(s) in conjunction with picking a browser which will run on the player (STEP 4)
- Connecting a player directly to your local internet, vs a wireless connection, is a better option as it will provide a better experience when playing content. The play will be less prone to connection interruption.
- You can mix player types and browsers within your network of displays. They do not all have to be the same, but it may be operationally easier if you have a standard.
- For more detail on considerations for selecting a player, click on the image below.


If you are having an integrator to get your screens and players set up, please give them the URL to this page so they can read this information.
A computer (player) of digital signage content needs to be dedicated to ONLY playing the content, so the content will play smoothly. To ensure you do not experience interrupted content play, here are the things that need to be done to prepare a player to be ready to play a Display5 Show:
- Use a player OS which is not bloated with many of the processes which a desktop user might require, e.g. scanning, updates, etc
- If you choose a Windows player, either strip down/off a lot of the unnecessary software or use the Windows Embedded OS
- Turn power management features OFF so the computer does not go to sleep from lack of mouse/keyboard activity
- Turn auto-updates OFF and choose to update the OS software on a scheduled basis, on off-hours
- Whenever possible, a hardwired Internet connection to the player is always preferred. Wi-Fi can be unreliable from a connection standpoint.
If your organization uses a standard browser, you can use that browser, otherwise, pick one of the common browsers to install on your player.
- To use Display5’s full capabilities, use a full-function browser such as Chrome, Firefox, Safari, Edge, or Opera.
- If you choose another browser you will have to test that the features you are using in Display5 are supported by that browser, e.g. some browsers do not support transitions well. This also applies to Microsoft Internet Explorer because Microsoft is putting its browser development resources into Edge, not IE.
Once you have selected a browser to run on your players you will need to configure the browser to make sure it plays the Display5 Shows optimally. This will include:
- Making sure the browser will autoplay videos if videos are part of the content you want to play in your Shows
- Suppressing auto-updates of the browser
- Auto-refreshing the browser
These topics are all covered separately in the browser section below.
Once your screens and players are all set up, you will need to register your players with the Display5 service. 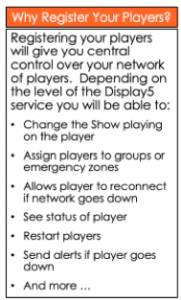 This should only be carried out by a Display5 supervisor. The supervisor should be logged in on the player first and then navigate to the player registration page.
To register a player, please follow the steps below:
- Log into the player and open the browser
- Go to the home page of your Display5 instance, e.g. http://yourserverip and login as supervisor
- Once you are logged in as supervisor – then enter the following URL: http://YOURSERVERIP/player.php
- A player registration window will appear (see “Player Add” image below)
- Important note: If you previously tried to register the player, then first and most important – clear the cookies on the device using the button at the bottom of the window.
- Fill out the information requested
- Enter the IP Address for the player, it may already be detected for you
- Give the Player a name (e.g. Samsung screen 01) and a location (e.g. cafeteria 1)
- For city name put in major city/town name, which will allow cookies to pull weather, local time and other info related to the city/town
- Enter the time zone for the player as well so the local time can be shown with some of the Display5 time widgets
- Pick one of your Shows from the drop-down list and click on “Register”
- You should see 2 pop-up dialogue boxes. One which adds cookies, the other confirms the player has been registered as a player with the Display5 server.
- The player should now be registered with the server and the selected Show should be playing on the screen.
- You can now change the Show that is playing on the screen at any time centrally when logged into the Display5 system.

Auto-refreshing your player’s browser is a best practice. Auto-refreshing your player’s browser helps to prevent the browser’s cache from filling up or becoming cluttered with remnant data/info which can cause the browser to freeze up and stop playing content.
To implement Auto-refresh on the players’ browser and keep your players running uninterrupted see the instructions below:
There are 2 options available:
- Install a VBS script file to run from the players’ desktop scheduler. Contact us and we will assist with this.
- Use a browser which has plug-ins which can be easily added to refresh the browser:
The frequency of refresh can vary. We recommend refreshing at least once a week and once a day is better. Refreshing at off-peak hours is ideal.
 We recommend suppressing auto-updates of both the player OS, e.g. Windows and the browser software.
Suppressing Auto-updates will lead to a more stable play of content (the Show) on the digital screens:
Player OS:
- Search for “How to disable auto-updates” for the player OS you are using.
- If the player is a managed device, disable the auto-updates in the management interface
Player Browser:
- In Chrome and Firefox, the current default is to allow auto-updates to occur in the browser software, this can sometimes present a problem when a policy change comes with the update (such as the recent autoplay for video policy change in Chrome).
- Disabling auto-updates of the browser can protect against unwanted changes in the behavior of the browser – e.g. Firefox allows you to do this directly from the custom settings (see a screengrab of Firefox settings below).

If you are using Chrome as your player’s browser and you would like to play videos in your Display5 Shows,  you will need to change the settings in Chrome to allow videos to play automatically.
How to enable Autoplay in Chrome (Version 76.0 and higher):
- Open the Chrome browser
- Go to the URL of the Display5 server and in the URL address bar, click on the icon to the left of the bar.


- From the drop-down menu, click on “Site Settings“
- Make sure the “Sound” is set to “Allow”

How to enable Autoplay in Chrome (versions prior to Version 76.0):
- Open the Chrome browser
- Type in the following URL in the address bar: chrome://flags/#autoplay-policy
- When the page opens, the “Autoplay policy” should be at the top of a list of options
- Make sure the “Autoplay policy” is set to “No user gesture is required” (see image below)
- Once you have set it to “No user gesture is required“, close the Chrome tab and Autoplay should now be enabled and your videos should play automatically.

If you are using Firefox as your player’s browser and you would like to play videos in your Display5 Shows, you will  need to change the settings in Firefox to allow videos to play automatically.
How to enable Autoplay in Firefox:
- Open the Firefox browser
- Type in the following URL in the address bar: about:config
- Scroll to, or search for, “media.autoplay.default” and set to 0 (zero)
- Also set the “media.autoplay.enabled.user-gesture-needed” to “false” (see image below)
- Note: The steps above pertain to Windows, Firefox, and although it may not be necessary on a Mac, for example, changing to the above settings should not adversely affect play on a Mac/Firefox device.
- July 19, 2019 update: Firefox is now blocking all media with sound from playing automatically. You will have to change the settings in Firefox to enable autoplay. Follow the instructions here: https://support.mozilla.org/en-US/kb/block-autoplay

Safari’s default is to NOT autoplay video or sound content from a website. If you are using Safari as your player’s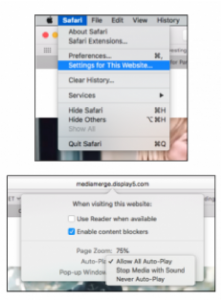 browser and you would like to play videos in your Display5 Shows, you will need to change the settings in Safari to allow videos to play automatically.
How to enable video Autoplay in Safari:
- Open the Safari browser
- Go to a Display5 Show URL in Safari (best if the Show has a video in the playlist so you can test that it auto-plays)
- Click Safari>Safari Settings for This Website (see image to right, top pic)
- This will open a window that allows you to toggle site-specific preferences, including videos with sounds. Make sure to select “Allow All Auto-Play” (see image to the right, bottom pic)
You will want your Shows to play on the whole screen without any other content on the screen. In Windows, this is known as “kiosk mode“.
How to enable kiosk mode in Windows IE:
- Once the Show is playing in the IE browser, simply press the F11 key and IE will automatically expand the Show play to the whole screen.
- Tip: To start IE in kiosk mode, type “ie.exe -k”, right before the URL, e.g. “ie.exe -k http://live1.display5.com/your_showpath“
You will want your Shows to play on the whole screen without any other content on the screen. In Chrome, this is known as “kiosk mode“.
How to enable kiosk mode in Chrome:
- Once the Show is playing in the Chrome browser, simply press the F11 key and Chrome will automatically expand the Show play to the whole screen.
- Tip: To start Chrome in kiosk mode, type “Chrome.exe -kiosk”, right before the URL, e.g. “Chrome.exe -k http://live1.display5.com/your_showpath“
- Tip 2: Go to the Chrome webstore and look for plugins which can help manage your full screen display.
You will want your Shows to play on the whole screen without any other content on the screen. In Firefox, this is known as “kiosk mode“.
How to enable kiosk mode in Firefox:
- Once the Show is playing in the Firefox browser, simply press the F11 key and Firefox will automatically expand the Show play to the whole screen.
- Tip: Firefox always resumes in the mode in which it was last set. So if you had pressed the F11 key to get to full screen play, Firefox will now assume that you always want full screen play until you press F11 again.
- Tip 2: You may want to check out a Firefox extension called R-kiosk 0.9.0 by Kimmo Heinaaro. This Real Kiosk Firefox extension:
- Defaults to full screen
- Diables all menus, toolbars, key commands, and right button menus, but;
- Alt + Home still takes you “Home”
To ensure that your Show (content) is playing using the entire screen canvas, you will have to make sure the browser is in FULL-SCREEN mode.
How to turn on full-screen mode in Safari:
- Open the Safari browser
- Click – View > Enter Full mode (see image to the right, “Enter full screen mode” is the last option).
- Ensure that the “Always Show Toolbar in Full Screen” option has not been selected, i.e. it should be grayed out (see image to the right, “Always Show Toolbar in Full Screen” is the first option and is grayed out).
You will want your Shows to play on the whole screen without any other content on the screen. In Opera’s browser, this is known as “kiosk mode“.
How to enable kiosk mode in Opera:
- Once the Show is playing in the Opera browser, simply press the F11 key and Opera will automatically expand the Show play to the whole screen.
- Tip: To start Opera in kiosk mode, type “opera.exe /KioskMode”, right before the URL, e.g. “opera.exe /KioskMode http://live1.display5.com/your_showpath“
Browsers have a native ability to cache content built into them. This capability is useful for playing content on displays to: reduce network load; play content faster; store GBs of data; caching can be managed by the user.
How it works:
- Caching is intelligently storing commonly-used data in quick-to-access locations so requests for data happen as fast as possible.
- Each browser has its own web cache, which is where resources like images and other web page content are stored for quick access.
- Browser caching saves time when requesting the same resources multiple times, e.g. a playlist in Display5.
- Every HTTP request and response have headers which tell the browser client what to cache and for how long.
- The different headers used, tell the client browser what content to store and what not to store.
- Display5 takes advantage of the different header types to instruct the browser what to cache, and what not to cache, e.g. Display5 does not cache pages driven by CSV values.
Total or temporary failure recovery, using App Cache:
- Some of the latest features of the HTML5 specification, Application Cache, allow a device that loses connection
 to the server, either temporarily or completely, i.e. a network failure, to play local content and/or automatically reconnect to the server when the network is restored.
 - Each Display5 server supports an Application cache that is automatically downloaded to an HTML5 compatible browser on a player.
- The content of the application cache is designed to keep checking for the reconnection of the network continuously. (It checks about every 30 secs)
- In the event of a network failure, the browser will revert to the locally cached content, the list of files called a manifest which is defined on the Display5 server.
- Display5 app cache content has a thread that is always running and will periodically check for the status.
- On re-establishment of the Network connection, Display5 Shows will automatically return to playing the Display5 Show assigned, without requiring any user intervention. This assumes the player did not lose power.
- Note: Chrome & Firefox are starting to only allow this capability with secure sites. i.e. the website must have a certificate, an https://[site]. We expect that App Cache in the near term will only continue to work with SSL sites.
Total or temporary failure recovery, using the Display5 Panel Refresher:
Display5 has developed a “Panel Refresher” plugin extension to the Chrome browser which is designed to significantly improve the ability for the browser to recover Show content in the event of a significant failure of the network or Internet connection.
Installing the Panel Refresher plugin on a player’s Chrome browser will avoid the situation where a network outage, or hiccup in connection, can cause the browser content play to freeze on the display.
This new extension keeps detailed information on each slide’s:
- Content being played
- Duration of the content play, and:
- URL path.
For each panel in the Show framework, the extension detects if there is a content play lag beyond 2 seconds. When the 2-sec threshold it breached, the Panel Refresher will adopt a healing mode for that panel and will attempt to reload the last item until successful. This means that if a panel has a major lag or delay in playing content, the extension will attempt to reload the slide and restore the content. This can also assist when specific web content causes the browser to fail due to some loading errors or script errors.
In the image to the right, you can see an unattractive message that has replaced the content in the top-right of the Show.
The browser has put that message there because it can’t get to the intended content or there has been some failure loading the URL. See the message detail below.
When the browser has been tripped up by events out of its control, which interrupts the normal play of content, it also freezes the browser and a browser refresh or restart is required.
The new Panel Refresher will prevent the browser from freezing. No more browser refresh/re-start required.
In the event of the connection being totally lost for an extended period, and the content is unavailable, the Panel Refresher will upon reconnection, re-establish the content in every panel, and Show play will resume exactly where it left off.
The Panel Refresher will work with desktop Chrome versions, as well as those found in Chrome devices, or Linux devices and any device running the Chrome browser.
In addition, the Panel Refresher will work in harmony with the new Chrome/Firefox, etc. local cache and cache recovery module which will be available soon. The Display5 Local Cache module will offer some advanced off-line browser play capabilities, especially useful when the network or Internet connection is lost for an extended period of time.
The Display5 Panel Refresher plugin is available for free on the Chrome Store (see link below). Add it to your players that are using the Chrome browser to play Display5 Shows.
https://chrome.google.com/webstore/detail/display5-panel-refresher/pcfcmgfmnaajmlkdiljbfangepjdbhjo
Cookies play a pivotal role in the behavior of the browser (player) when connected to the Display5 server. Display5 uses cookies to identify the unique IP of a player, to identify and store the user identity (login account) on the player, to store information on the player: Time zone; City name; Room name (used for room scheduling/booking).
How it works:
- Server interactions with the Display5 server often involve sending the cookie information to the server to identify what content should be played locally on the device.
- This includes pushing new Shows, emergencies Shows, updated content to play which is local to the device, etc.
- Display5 software is based on server-side PHP, so there is no requirement for an application on the device,
- All updates to the content the device is playing are accomplished through passing cookie information
Display5 uses a number of 3rd party integrations with Web content providers. These 3rd parties change their token policies from time to time. Here is a list of some of those content providers: Google Maps; WeatherStack weather; Google calendar; Instagram; Twitter; Office 365; Vimeo; and others.
How it works:
- These content providers can change their policies for delivering content to 3rd party apps from time-to-time.
- They have been known to make changes to disable certain access rights for different reasons. Typically when there is an abuse of their free content.
- Display5 is a registered app developer for all of these types of web services companies.
- We would recommend that our customers look into getting their own API keys for these content providers, to avoid any disruption in information service.
- Upon obtaining your own API keys, they can be easily changed from the default Display5 ones.
- By registering as app developers, clients also get notifications of changes to policies as well as ensuring that their own private app keys are used to access any of the content that they wish to display.
TV feeds are increasingly being distributed over the Internet (IP). It is very easy to integrate an IP stream into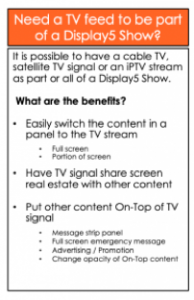 Display5 using our live stream widget. But cable and satellite TV are still the majority sources for live TV. Below we detail how to play the live TV within a Display5 Show.
How it works:
- An IPTV feed (over the Internet) is easy to include as part of a D5 Show. Simply select the live stream widget to add to the playlist for the target panel and insert the IPTV URL stream in the widget, information on obtaining the URL of the stream can be obtained from D5 Support. Or alternatively, if you have an EMBED code block for a live stream instead of a URL, you can use the Embed widget and insert the code directly into the settings.
- To include the TV signal/feed from cable or satellite TV you will need something like the Hauppauge WinTV-HVR 955Q (pictured below)
- It plugs into a player’s USB 2.0 port with TV cable feeding into the other end
- More info here: http://www.hauppauge.com/pages/products/data_hvr955q.html
- The player can be any Windows PC but make sure it has the muscle to drive the TV signal plus any other content you want to play.
- You will also have to buy the WinTV extend software (roughly $10) and install it on the player http://www.hauppauge.com/pages/products/data_extend.html
- If you would like each screen to independently show a different TV channel, you will need the set up described above for each screen. If the screens are all showing the same content you have the option of using signal distribution with a single set up.
- Alternatively, you can connect players to the IP stream from the WinTV-HVR on a single PC. This will only work with a smaller number of players getting the IP stream.
- We have some tips and tricks to allow you to play the WinTV:
- To automatically start playing a specific channel
- To not require a login
- To display the video in a full window without the channel guide and top menu showing. Please contact us.

There are 2 widgets that enable the play of a live stream.
First, in the “Video” widget category, there is a Flowplayer widget, which is a Javascript player that uses Flash to display streams in specific formats – RTMP (Flash), RTP (legacy streaming) and some versions of the m3u8 format videos. You need the URL of the stream that you want to play with this widget and enter it into the appropriate field in the widget details.
Second, in the “Live Stream Widgets” category, there is a “Live TV” widget. This widget uses a Javascript pure video player with no Flash required, making this a more current approach to stream playback. The “Live TV” widget is able to support the m3u8 video format (h264 encoding). It plays back this content type well if the stream itself is reliable. There are some sample streams included with this widget designed to allow you to test the widget. You can enter your own stream URL into this widget as desired.
Using a Raspberry PI, as a player for Display5 Shows is cost-effective for a player option and works well as long as the content workload isn’t too much for the PI processor. Some Display5 customers are using these players and are very happy with them.
If you are trying to get the Raspberry PIs to play on a 1080p resolution screen, they have encountered some challenges. Below, you will find some troubleshooting steps to get 1080p working with your Raspberry PI:
- The Raspberry PI has a build of the Chromium browser available, as well as Firefox.
- One thing to be aware of if you are playing Shows with a 1920 x 1080 resolution, is that you may find the edges of the Show are “cut off”.
- Sometimes the default resolution which the graphics driver on the PI uses is 1824 x 984, which is a little odd.
- The display resolution management System tool on the PI does not provide an option for 1920 x 1080.
- To remedy the problem, you need to edit the /boot/config.txt file in an editor and enable the Overscan option.
- Also, in the config.txt file, you will see 2 lines related to console resolution. Commented these out and set the resolution width to 1920, and height to 1080.
- Here is a link with more detailed instructions: https://www.raspberrypi.org/forums/viewtopic.php?t=5786
- Once Overscan is enabled you will be able to access the full resolution of the PI (1080p).